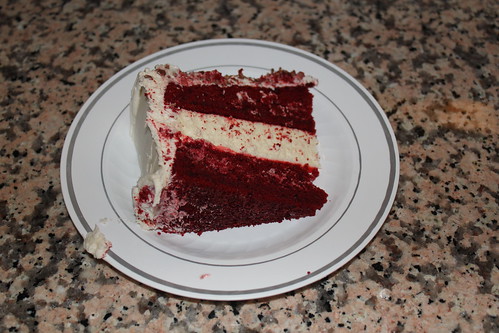
So for Thanksgiving, I decided to attempt a layered red velvet cheesecake. I hadn't made a layer cake before and ever since I had tried the cake from the Cheesecake Factory, I knew I had to make this cake. Thanksgiving seemed like the perfect occasion to make it. I looked for some recipes and came across the one on Erin's Food Files.
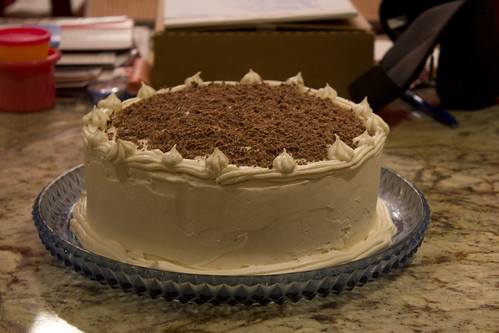
The cake turned out great. I was pretty impressed with myself. It looked really good and tasted amazing. I will definitely be making this cake again! I liked the cream cheese frosting, it wasn't too sweet which was something I worried about. It was the prefect match to it all. I was also thrilled that for the first time, my cheesecake didn't crack! Even though it was the center layer and no one would see the cheesecake itself, I was so happy that it did not crack and it was soooo yummy. My hubby approved and he loves cheesecake. It took a lot of restraint for him not to devour the cake before Thanksgiving. I will be using this cheesecake recipe again.
Layered Red Velvet Cheesecake
From: Erin's Food Files
Cheesecake adapted from Martha Stewart
Red velvet cake and frosting adapted from Apple a Day
For the cheesecake:
1 1/4 pounds bar cream cheese (20 oz), room temperature
3/4 cups sugar
1/2 teaspoon finely grated lemon zest, plus 1/2 tablespoon fresh lemon juice
1/4 teaspoon coarse salt
2 large eggs
1/2 cup sour cream
For the cake:
2 1/2 c. cake flour
1 1/2 c. sugar
1 tsp. baking soda
1 TBSP cocoa powder
1 tsp. salt
2 eggs
1 1/2 c. vegetable oil
1 c. buttermilk
2 TBSP (1 oz.) red food coloring
1 tsp. vanilla extract
1 tsp. white distilled vinegar
For the frosting:
12 oz. cream cheese, softened
12 oz. butter, softened
1 1/2 tsp. vanilla extract
3 c. confectioners' sugar
1 bar white or dark chocolate (Optional for decoration), I used Ghiradelli
Directions:
For cheesecake:
Preheat oven to 325 degrees. Set a kettle of water to boil. Using an electric mixer, beat cream cheese on medium until fluffy, scraping down side of bowl. Gradually add sugar, beating until fluffy. Beat in lemon zest and juice, and salt. Beat in eggs, one at a time, scraping down side of bowl after each addition. Beat in sour cream.
Cut parchment paper in a circle and line the bottom of the cheesecake pan. Wrap bottom half of pan in foil. Pour in filling; place in a roasting pan. Pour in boiling water to come halfway up side of springform. Bake until just set in center, about 45 minutes. Remove pan from water; let cool 20 minutes. Run a paring knife around edge; let cool completely. Cover; chill overnight, then wrap in plastic wrap and freeze.
For the cake:
Preheat oven to 350°. Sift together flour, sugar, baking soda, cocoa, and salt into a medium bowl.
Beat eggs, oil, buttermilk, food coloring, vanilla, and vinegar in a large bowl with an electric mixer until well combined. Add dry ingredients and beat until smooth, about 2 minutes.
Divide batter evenly between 2 greased and floured 9" round cake pans and bake 25-30 minutes, rotating halfway through, until a toothpick inserted in the center of each cake comes out clean. Let cakes cool 5 minutes, then invert each onto a plate, then invert again onto a cooling rack. Let cakes cool completely, then level.
Frosting:
Beat cream cheese, butter, and vanilla together in a large bowl with an electric mixer until combined. Add sugar and beat until frosting is light and fluffy, 5–7 minutes.
Assembly:
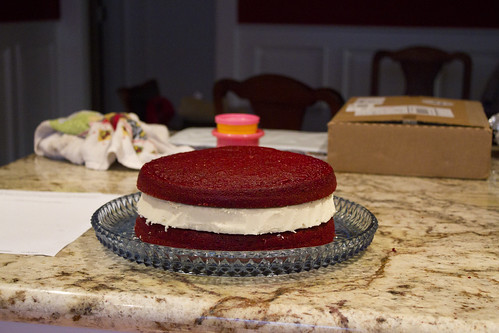
Place bottom layer on cake stand. Remove cheesecake from freezer, unwrap, and remove from metal bottom, then peel off parchment paper. Place cheesecake layer on top of the bottom layer of the red velvet cake. If the cheesecake is wider than the cake, and it is necessary to to trim it, wait approximately 10 minutes for the cheesecake to soften, then trim it with a knife. Place top layer of cake on top of the cheesecake, and coat with a generous layer of the cream cheese frosting to act as the crumb coat. Be careful not to get any red velvet crumbs in the bowl of frosting! Refrigerate approximately 30 minutes, then frost with as much of the remaining frosting as necessary. Top with shaved white chocolate and/or shaved dark chocolate. Refrigerate until ready to serve. (This cake doesn't have to stay in the fridge until IMMEDIATELY before serving, so don't worry if you have a 30 minute lapse between the refrigerator and serving.)